Google Maps in React Native Part 1: Installation
TL;DR: We'll install react-native-maps, and get an API key from Google.
This is part of a react-native tutorial series, in which we’re going to dive into how we can display maps inside a React-Native app.
If you want to follow along this series I have setup a repo in which every part will have its starting and ending points in their corresponding branches.
About This Article
We’re going to setup react-native-maps from npm, a package maintained by the react-native-community itself.
Install react-native-maps
To install the package using npm:
npm install --save react-native-mapsTo install the package using yarn:
yarn add react-native-mapsNow we need to link the package:
react-native link react-native-mapsSetup Google
In order to embed Google Maps into your app, you need to have a API key from a Google Cloud project with the right APIs enabled.
Step 1. Select / create a project
Head to https://console.cloud.google.com/ and spin up a new project (or select an existing one).
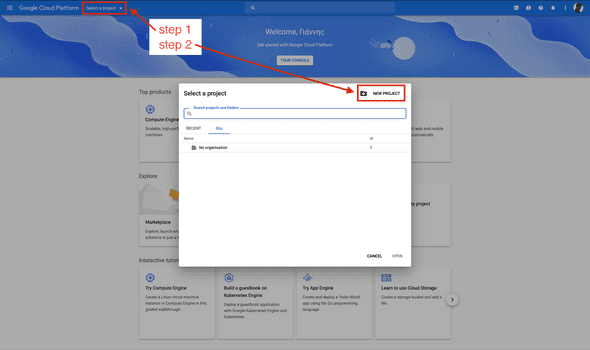
To create a new projet click “Select a project” from the top left corner, select “NEW PROJECT” on the next popup and then fill in the new project form.
Step 2. Enable APIs
Go to APIs & Services and select “ENABLE APIS AND SERVICES”. Then select each one of the APIs you want to use and enable them.
For now we only need “Maps SDK for Android” and “Maps SDK for iOS”.
Step 3. Get the API Key
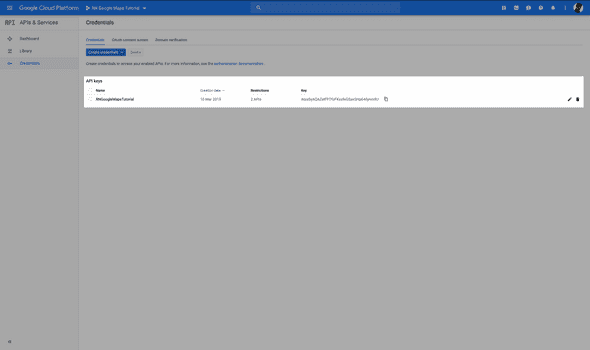
Go to APIs & Services / Credentials and click on “Create Credentials”, and on the dropdown select “API key”. After that you will be prompted to restrict the API key, which is something you can do if you want.
You can also rename the API key if you want. I will rename it to “RNGoogleMapsTutorial” so that I always know where this key is used.
Setup Android
Installing the Google Maps on Android requires less work than on iOS for obvious reasons.
Open up your app’s AndroidManifest.xml file and add the following lines inside the <application> tag:
<meta-data
      android:name="com.google.android.geo.API_KEY"
      android:value="YOUR_API_KEY"/>
Replace “YOUR_API_KEY” with the key you created in the Google Cloud project and you’re good to go.
Setup iOS
On iOS, react-native-maps works out of the box, but it does so using the Apple Maps instead of the Google Maps. Now that may work just fine for you, but for this tutorial we want both platforms to use Google Maps, so we’ll go ahead to install Google Maps for iOS.
Step 1. Install Cocoapods
To install Cocoapods on your machine open up terminal and run the following:
sudo gem install cocoapodsStep 2. Podfile
In the terminal, navigate inside your app’s ios folder and run the following:
pod initThis will create a Podfile in there. Open it in Xcode and add the pod “GoogleMaps” to your app’s target. It should looke somewhere along the lines of this:
# Uncomment the next line to define a global platform for your project
# platform :ios, '9.0'

target 'RNGoogleMapsTutorial' do
  # Uncomment the next line if you're using Swift or would like to use dynamic frameworks
  # use_frameworks!

  # Pods for RNGoogleMapsTutorial

  pod 'GoogleMaps'
  target 'RNGoogleMapsTutorialTests' do
    inherit! :search_paths
    # Pods for testing
  end

end
Now install the pod by running the following inside the ios folder:
pod installThis will install the GoogleMaps pod to our target and create .xcworkspace file for us to use in Xcode from now on instead of the .xcodeproj one.
Step 3. Copy AirGoogleMaps
Open the newly created workspace in Xcode. In the Finder look for the AirGoogleMaps folder. It should be inside YOUR_APP_PATH/node_modules/react-native-maps/lib/ios/.
Drag that folder into your project in Xcode and on the popup that will appear, check the “Copy items if needed” option and choose “Create groups”.
Step 4. Setup Preprocessor Macros
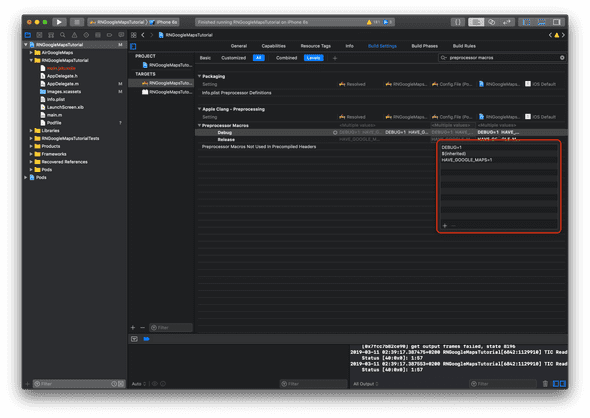
Select your target, and go to Build Settings. In the search bar type preprocessor macros and add the following line to both Debug and Release:
HAVE_GOOGLE_MAPS=1Step 5. Add the API key
Open up the AppDelegate.m file in Xcode and import <GoogleMaps/GoogleMaps.h>, then add the API key with [GMSServices provideAPIKey:@"YOUR_API_KEY"] where “YOUR_API_KEY” is the key you created in the Google Cloud project.
The file should now look something like this:
// ...
#import <GoogleMaps/GoogleMaps.h>

@implementation AppDelegate

- (BOOL)application:(UIApplication *)application didFinishLaunchingWithOptions:(NSDictionary *)launchOptions
{
  NSURL *jsCodeLocation;
  [GMSServices provideAPIKey:@"AIzaSyAQAZelFPTfoFKxzfeGSaxSHp64ilynm9U"];  // ...
}

@end
Test the app
Change App.js and add the following:
import React, { Component }         from 'react';
import MapView, { PROVIDER_GOOGLE } from 'react-native-maps';

type Props = {};
export default class App extends Component<Props> {
  render() {
    return <MapView provider={ PROVIDER_GOOGLE } style={ { flex: 1 } } />
  }
}
Now just fire up your simulators and run the app.
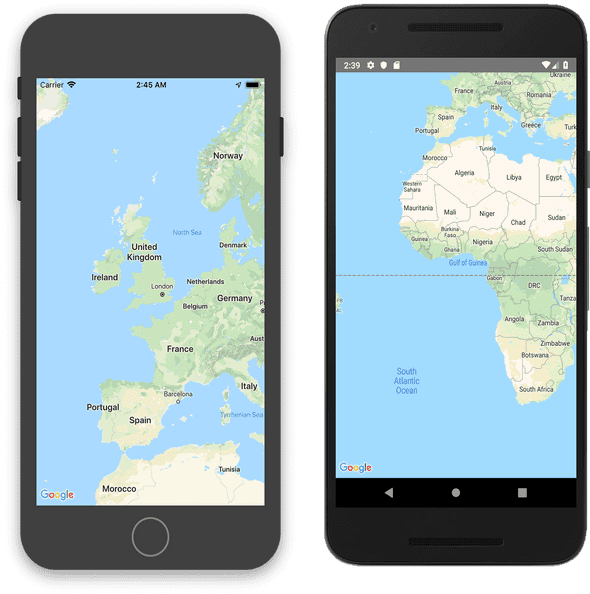
Hopefully, you should see fullscreen maps like these:
Troubleshooting
If you encounter any problems with linking or building your app you can read here for some troubleshooting.


